A lot of website development doesn't take place online but on personal and work computers. If you're a developer, you can use a local environment to create and test new websites, including WordPress projects.
As you may know, WordPress requires some specific software to run. However, instead of installing and configuring it all manually, you can use a 'bundle' such as WAMPServer (or WAMP in short) to set up a development environment quickly. This means you can get to work faster.
In this guide, we'll teach you how to set up a local WordPress website on a Windows PC using WAMP. First, let's talk about what WAMP is and the whys of local WordPress development!
Why Use a Local WordPress WebsiteThe concept of a local WordPress website is simple. You install the WordPress CMS on your personal computer to develop new sites, plugins, and themes. Whatever you're working on is only accessible to you, which is fantastic from a security standpoint.
Security isn't the only perk of using a local WordPress development environment, though. Some additional benefits include:
Since we're using WordPress, exporting your projects to a live environment is relatively simple. All you have to do is create a backup and restore it on a public server when you're ready for your project to see the light of day.
We've mentioned the term 'development environment' several times so far. That's because for WordPress to run locally, you need to set up several software components on your computer. Those include web server and database software, as well as the PHP programming language.
With WAMP, you can set up an environment that uses Apache (web server), MariaDB (database software), and PHP. As for the "W" at the start of the acronym, it stands for Windows.
How to Install WordPress Locally on a Windows PC Using WAMP (3 Steps)WAMP is far from the only solution for setting up a local WordPress development environment (other options include MAMP and XAMPP). However, this particular software stack uses the most popular options for WordPress development on a Windows PC, meaning it's an excellent choice. As such, let's talk about how to get a local website up and running.
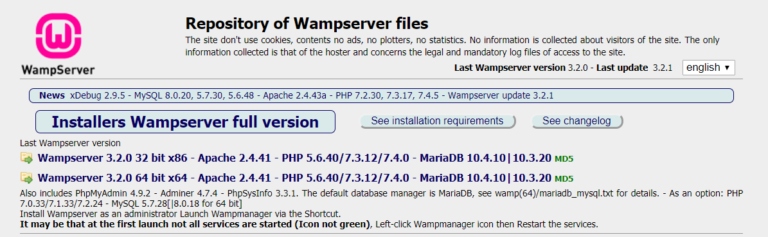
Step 1: Download and Install WAMPThe first thing you need to do is go to the WAMP download page and grab the software installer. WAMP only offers options for 32- and 64-bit Windows versions, so download whichever one corresponds with your OS:
Once the installer is ready to use, run through the installation process. This works like any other program, so don't be intimidated. However, at one point, the installer will ask you if you want to use Internet Explorer as the default browser for WAMP:
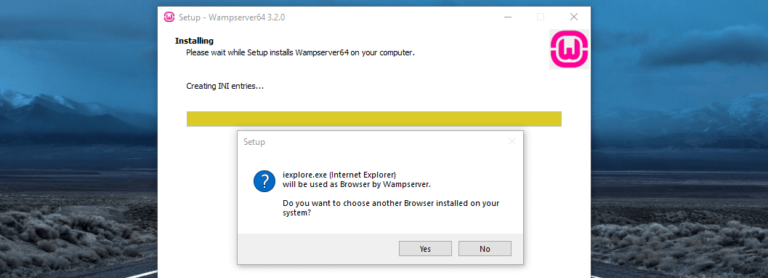
We'll be diplomatic and suggest you'll want to select your favorite browser here instead. At this point, the program will be ready to use.
Step 2: Set Up a New Database Using phpMyAdminBefore you can install WordPress, you need to set up a new database for the CMS to use.
To do this, we're going to use phpMyAdmin, which is a PHP tool for managing MySQL and MariaDB databases and comes bundled with WAMP.
If you open your Windows system tray, you'll see a new icon bearing a W (for WampServer). Clicking this icon will enable you to interact with your local server. From here, you can access your server configuration overview:

Notice the URL on the navigation bar reads localhost, which means we're accessing a local file.
Among WampServer's options, you'll find one that reads phpMyAdmin, which you'll want to click. Next, type root within the Username field and leave the password blank, then click on Go:

You should now have access to the primary phpMyAdmin dashboard. Click on the Databases tab at the top of the screen, and you'll see an option to set up a new database on the next page:
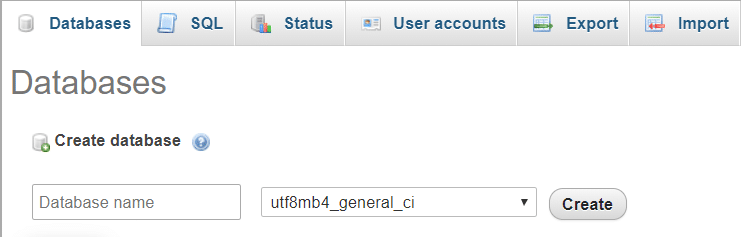
Select a name for your database and type it within the Database name field. For now, the database should be empty; it'll be populated with tables and data by the WordPress installer.
Don't forget to note down the database name, though, because you'll need it for the next step.
Step 3: Download and Install WordPress on Your Local ServerOnce the database is ready, it's time to download WordPress and install it on your computer. The first part is simple — go to WordPress.org and navigate to the download page:

The WordPress CMS comes in a ZIP file. Download and unpack it, then find a folder inside called wordpress. Move this folder into the wamp64/www directory:

Feel free to rename the wordpress folder, but keep in mind whichever name you use will become a part of your local site's URL.
To access the WordPress installer, navigate to http://localhost/wordpress in your web browser. We've decided to keep the original name here, but you'll need to use whatever you changed yours to. Now you'll get access to the WordPress installer:

Select a language and move on to the next step. Here, you'll need to enter the name of your database, as well as the username and password you used before. We named our database test and are using root as the username with no password:

Please keep in mind that it's never a good idea to use generic database names, usernames, or passwords with a live site. However, since now we're using a local setup, it's fine.
After filling out the required fields, hit the Submit button. If everything is working fine, WordPress will prompt you to run its installer:

Now you get to choose a title for your site and set your admin username, password, and email:

Once you're ready, click on the Install Now button and a success message should appear:

To access your new local setup, go to http://localhost/wordpress/wp-login.php and you'll see the classic WordPress login page:
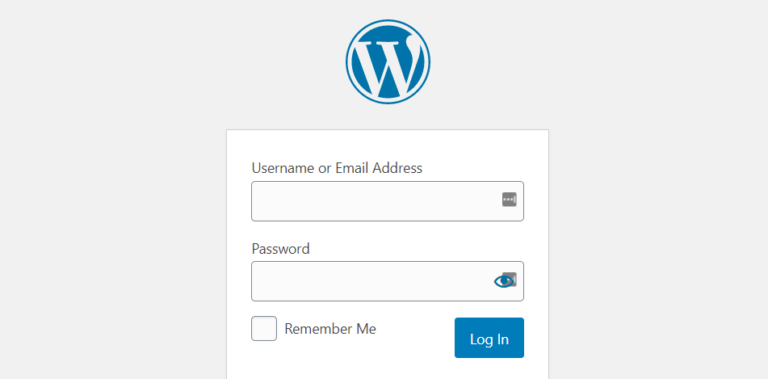
Remember that your local site's URL might be different depending on whether you changed the wordpress folder's name at the beginning of this step. In any case, once you log in to WordPress, you can get to work as usual.
ConclusionThere are a lot of ways you can go about setting up a local WordPress development environment. For Windows users, your best bet is WAMP that enables you to use an integrated software stack that combines Windows, Apache, MariaDB, and PHP.
Using WAMP to set up a local WordPress website is easy, and it boils down to three steps:
Do you have any questions about how to use WAMP? Let's go over them in the comments section below!
Free Blogger templatest, Free Blogger templates Minimalist, Free blogger templates responsive, Layouts blogger, Simple free blog template, Blog template WordPress, Goyabi templates, Nawigacja na stronie, Free Blogger templates, Free Blogger templates Minimalist, Btemplates, Free blogger templates responsive, Simple free blog template, Blog template WordPress, Blogger template responsive free, Blogger templates,s Free Blogger templates Free Blogger templates Minimalist Layouts blogger Free blogger templates responsive Btemplates Blogger portfolio template Blog template WordPress Free themes blogspot Theme Blogger Premium Gratis Download Parhlo Premium/Magazine Blogger Template Google Infinite AMP Responsive Blogger Template | Blogspot Infinite AMP Sarkari Result WordPress Theme Free Download Amalia • v1.0 - Responsive •Blogger Template Amalie • Blogspot TemplateCodeify v1.0 - Personal Blogger Template new blogger templates, best blogger templatesLuvblog - Responsive HTML5 Blogger Template Twitter Bootstrap 3.0 100% Responsive DesignCream - Responsive News & Magazine Blogger Template Cream Magazine | ThemebeezSeo Mag - Responsive Blogger TemplateBest - SEO Friendly Blogger Templates • Top Best Free • New TemplatesWaverly - Personal Responsive Blogger Template250+ Best Free Responsive Blogger Templates PackNewsify v1.0 - News NEWSIFY BLOGGER THEME FEATURES Magazine Blogger Templateresponsive blogger templatesprofessional blogger templates freefree customizable blogger templatesfree blogger templates simple blogger templates freefree html blog templatesclean blogger templatespremium responsive blogger templates
Comments
Post a Comment